How to use to the Pittsburgh
Supercomputing Center
Grant
Management System

Documentation Outline:
Click on any of the outline links to go directly to that section of the documentation.
1. Documentation for PIs and Co-PIs
A. Display grant information for grant:
B. Display accounting information for grant:
C. Manage grant:
-Set notifications for grant:
-Set soft limits for grant:
-Add a new user to grant:
-Remove a user from grant:
-View/update abstract
D. Manage user information for:
-Update Address
-Add/Remove Mailing Lists
2. Documentation for Accounting Users
A. Display grant information for grant:
B. Display accounting information for grant:
C. Manage user information for:
-Update Address
-Add/Remove Mailing Lists
3. Documentation for Regular Users
A. Display grant information for grant:
B. Manage user information for:
-Update Address
-Add/Remove Mailing Lists
1. Grant PIs and Co-PIs
Can access detailed grant accounting information regarding their grant,
information
pertaining to individual users on their grant, and the same general grant
allocation
information that regular users can access. PIs and Co-PIs also have the
power to
manage their grant by setting remaining time and usage notifications,
setting usage
limits, adding and removing users, and updating the grant abstract.
2. Accounting Users
Users who have been given accounting privileges by their PI can access
detailed grant
accounting information and general grant allocation information. They can
also update
their personal user information.
NOTE: CURRENTLY, THE NSF TERAGRID ADD USER FORM DOES NOT INCLUDE A PROVISION TO ADD A USER TO A GRANT WITH DETAILED ACCOUNTING PRIVILEGES. TO GIVE AN NSF TERAGRID USER ACCOUNTING PRIVILEGES, THE GRANT'S PI SHOULD SEND EMAIL TO GRANTS@PSC.EDU.
3. Other Users
Regular users who have not been given special
privileges by their
PI can still access general grant allocation information. They can also
update their
personal user information.
Please follow the hyperlinks above to access documentation for the PSC Grant Management System pertaining to your level of access. If you are unsure of your access level, please contact your PI or call the PSC Hotline at 1-800-221-1641.
PSC Grant Management System Documentation for PSC PIs and Co-PIs
As a PSC PI or Co-PI, you will be able to use the PSC Grant Management
System to
access information pertaining to your grant(s) and to make management
changes to your
grant(s) which regular users will not be able to do. You will also be able
to view
information on any other grants which you are a regular or accounting user
on.
Accessing the PSC Grant Management System:
1. Access the PSC Grant Management System by entering
https://grants.psc.edu/cgi-bin/arms/authenicate/GMS_grant.pl
into your web
browser. This address is also a link on the main PSC ARMS page.
2. You will be prompted for your PSC username and password. Enter your
username and
your Kerberos password to access the Grant Management System. You will use
the same
username and Kerberos realm password that you use to login to all of the
PSC computing
and front end systems.
3. After logging in, you will see a greeting page welcoming you to the PSC
Grant
Management System.
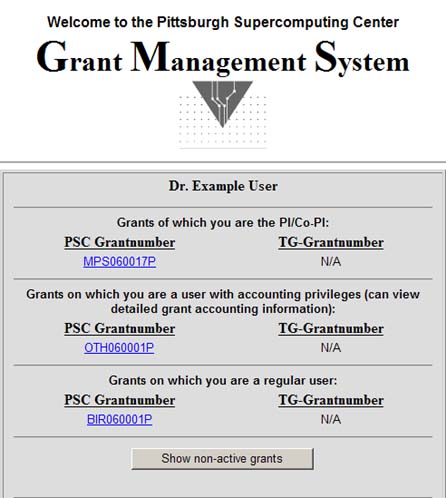
In the center of the page, you will see a greeting box labeled with
your
name. In this
box, all of the active grants your are a user on will be displayed. On the
left side,
the PSC grant number is displayed. To the right of this, the corresponding
NSF/Teragrid grant number is shown. All grants in the greeting box will be
displayed
in this manner. In the top section of the greeting box, any grants which
you are the
PI or Co-PI of are listed. In the next section of the greeting box, any
grants on
which you are a regular user are listed. In the last section of the
greeting box will
be a hyperlink labeled "Display Non-Active Grants". If you have any
expired grants
that you wish to view or manage, click this link and they will be
displayed in the
same manner as the above grants. If you are not a user on any non-active
grants, the
message "There are non non-active grants to display" will be displayed.
Each PSC grant number listed is a hyperlink. Click on the grant you wish
to see
information on to access or manage information pertaining to that grant.
If you click on a PSC grant number for which you are the PI or Co-PI, you will be taken to a page detailing information pertaining to the grant you selected.
In the box at the top center of the page, the basic grant information for the selected grant is displayed under the title "Currently Selected Grant". This information includes the PSC grant number, the NSF/Teragrid grant number (if applicable) the PI name, the grant start and end dates, and the grant title.
Below this, under the title "Options", four hyperlinks and a "Home" link are listed. These four links will allow you to navigate between managing your grant, generating usage reports, viewing accounting information, managing your own personal user information, and returning to the main page. "Home" will take you to the first page of the PSC GMS.
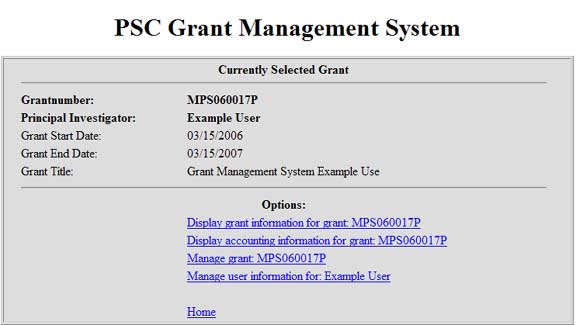
Click on the hyperlink below to see documentation for each option:
"Display grant information for grant:"
"Display accounting information for grant:"
"Manage grant:"
"Manage user information for:"
"Display grant information for grant:"
Click the "Display grant information for grant:" link to see basic information regarding the selected grant. When you click on the link, this basic information will be displayed in three boxes. When you have finished with this information, you can scroll to the top, where the other five hyperlink options are still displayed in the "Currently Selected Grant" box.
In the first box, titled "Chargeable Machines", any PSC machines which you have a chargeable allocation on will be displayed. All of these machines require an allocation granted and then charged from. From left to right, the platform, machine, charge ID, allocation start date, allocation end date, allocation amount, and remaining balance will be displayed. For example, if you received an allocation of 115,000 on the PSC HP Marvel Jonas which started on 3/31/2005, and used 10,000 units on this machine, you would see the following information displayed:
Platform - Machine - Charge ID - Start Date - End Date - Allocation - Remaining Bal
JONAS - JONAS - yourchargeid - 03/31/2005 - 03/31/2006 - 115,000 - 105,000
In the next box, titled "Non-chargeable Machines", any PSC machines which you have access to will be displayed along with the end date of your grant.s access to this machine. These machines include our file archiver (EL).
Finally, in the next box, titled "Non-Active Production Machines", you will see a listing of any machines which your grant once had access to but on which your allocation has expired. These machines are displayed in the same format as "Chargeable Machines".

"Display accounting information for grant:"
This option allows you to view more detailed usage and accounting information regarding the currently selected grant. When you follow this hyperlink, you are taken to a menu labeled "Options for displaying detailed accounting information". You have several choices here to generate a report on the usage of the specified grant and it's users.
Note: The "Currently Selected Grant" menu box will still appear on your page. You can utilize the options in this box at any time. Clicking on "Home" will return you to the first page of the PSC GMS.
The output of your query is by default ordered by the run date of each job. You can change this by clicking on the drop down menu and selecting one of the other eight options.
Next, you can select a date range for your query. Enter the date which you want to start your query with in the first box and the date you want to end your query with in the second box. You can query all jobs run by entering the selected grant's start date in the first box, and either the current date or the grant's end date in the second box (depending on whether the grant is active or not).
Finally, you can specify which machine(s) you want your report to show. By default, the query will display results for all machines which the selected grant has had an allocation on. If you want to generate a more specific report, click on the drop down menu and specify which machine you would like to display.
When you have made all of your query specifications, click on the "Submit Query" button to generate a report with the results you requested. Your report will be displayed in a box, with all of the jobs listed vertically according to the specifications you selected. From left to right across the page, you will see the following information for each job:
Run Date - Username - Job ID - Resource ID - Command - SU Used - SU Charged - Refund
At the end, the SU Used, SU Charged, and Refund columns are summed.
This box is easily copied and pasted into a spreadsheet program such as Microsoft Excel.
"Manage grant:"
This option, available to you as a PI or Co-PI, allows you to manage several aspects of the selected grant.
When you follow this hyperlink, a box displaying five different options will appear.
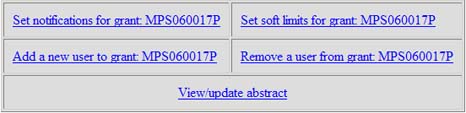
These options are:
"Set notifications for grant:"
"Set soft limits for grant"
"Add a new user to grant:"
"Remove a user from grant"
"View/update abstract"
Click on any of the above links to see documentation for this feature.
Note: The "Currently Selected Grant" menu box will still appear on your page. You can utilize the options in this box at any time. Clicking on "Home" will return you to the first page of the PSC GMS.
"Set notifications for grant:"
You can utilize this function of the PSC GMS to set up remaining time and remaining usage email notifications for your grant.
To utilize this function, login to the PSC GMS. Click on the grant number hyperlink to select the grant which you wish to work with. Next, click the "Manage Grant" hyperlink. Then click on the "Set notifications for grant:" link.
When you click this link, two menu boxes will appear.
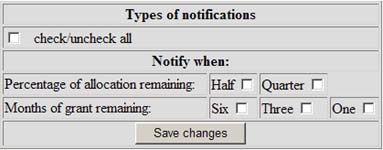
In the first menu box, select the type of notifications which you would like to be sent. You can set this feature to send notifications when the selected grant has half of it's allocation remaining, a quarter of it's allocation remaining, when six months of active status for the grant are left, when three months of active status for the grant are left, or when one month of active status the grant is left. You can select as many of these as you wish, and you also have the option to select them all by clicking the check box next to "check/uncheck all". When you have finished setting up which notifications you want to be sent, click on the "Save changes" button.
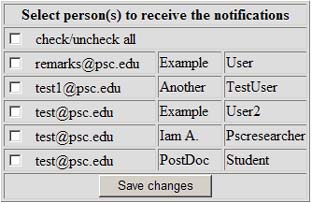
In the next menu box, you can select which members of the currently selected grant will received the notifications you set in the first menu box. All of the active users of the selected grant are displayed in the box, along with the email address we have on file for them. To select a user to receive the notifications, click on the check box to the left of his or her email address. When the user is selected, the notifications you selected in the first menu box will be sent to the displayed email address. You have the ability to select any or all of the users listed. To have notifications sent to all users listed, click the box next to "check/uncheck all", at the top of the menu box. When you have finished selecting users to receive notifications, click on the "Save changes" button at the bottom of the menu box.
This finalizes your choices, and the email notifications you opted for will now be sent to the users you selected.
"Set soft limits for grant"
Utilize this function of the PSC GMS to set "soft" usage limits for any individual user on your grant. When the user reaches the usage limit you have set for him or her, an email will be dispatched to you informing you that the user has reached his or her soft limit.
To utilize this function, login to the PSC GMS. Click on the hyperlinked grant number to select the grant which you wish to work with. Next, click the "Manage Grant" hyperlink. Then click on the "Set soft limits for grant" link.
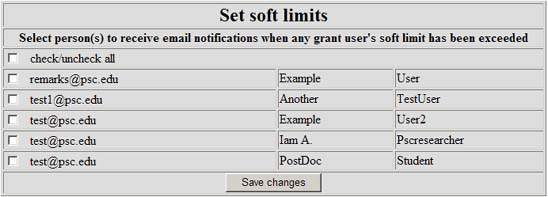
When you click on this link, a menu box displaying all of the users on your grant, with their email addresses will appear. There will be a checkbox to the left of their email address. Check this box if you want this user to receive notification when ANY user on your grant has exceeded his or her soft limit. To select or de-select all users on your grant, use the check box marked "check/uncheck all". When you have finalized your choices, click the button labeled "Save Changes" to implement the choices you made.
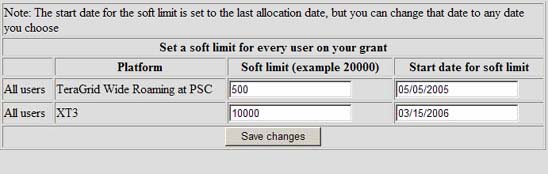
In the next menu box, labeled "Set a soft limit for every user on your grant", you have the option to set usage limits for EVERY user on your grant. All of the machines your grant has access to are listed in this box. From left to right, the following information will be displayed: Machine, soft limit (an entry box, empty if no soft limit has been set), and start date for soft limit.
The soft limit will include all usage starting from the date entered into the entry box on the right side of the menu labeled "Start date for soft limit". The default date is the date the last allocation was awarded to your grant, but you can change this to whatever you choose simply by typing a new date into the box. To set a soft limit for EVERY user on your grant on the machine specified, simply type the limit amount into the "Soft Limit" entry box in the proper row for the machine you want to limit them on. For example, in the box below, all users on the selected grant have been assigned a soft limit of 500 SUs on Teragrid Roaming at the PSC, and 10000 SUs on the XT3. When you have finished selecting limits for EVERY user on your grant or changing the start date for these limits, click on the "Save Changes" button to implement the choices you selected.
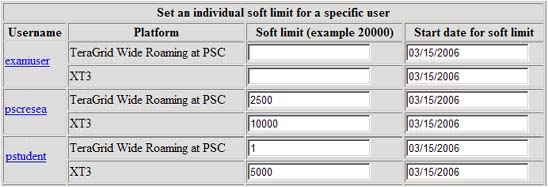
Next, you have the option to set usage limits for each INDIVIDUAL user on your grant in the next menu box, labeled "Set an individual soft limit for a specific user". All users on your grant are listed in this box. From left to right, the following information will be displayed in this box: Username, machine(s) user has access to, soft limit (an entry box, empty if no soft limit has been set), and start date for soft limit. The username is a hyperlink. Clicking on this link will bring up a new page showing detailed grant accounting for this user on your grant so that you are able to make an informed decision regarding this user's soft limit. Follow the instructions provided in the "Display accounting information for grant:" section of this documentation to generate more specific queries for this user's usage.
The soft limit will include all usage starting from the date entered into the entry box on the right side of the menu labeled "Start date for soft limit". The default date is the date the last allocation was awarded to your grant, but you can change this to whatever you choose simply by typing a new date into the box. To set a soft limit for an INDIVIDUAL user on your grant on the machine specified, simply type the limit amount into the "Soft Limit" entry box in the proper row for the user and machine you want to limit them on. For example, the sample box below shows that user "examuser" has no soft limits set; user "pscresea" has a softlimit of 2500 on Teragrid Roaming at the PSC, and 10000 on XT3; and user pstudent has different softlimits still. When you have finished selecting limits for INDIVIDUAL users on your grant or changing the start date for these limits, click on the "Save Changes" button to implement the choices you selected.
"Add a new user to grant:"
Utilize this function of the PSC GMS to add a new user to the currently selected grant.
To utilize this function, login to the PSC GMS. Click on the grant number hyperlink to select the grant which you wish to work with. Next, click the "Manage Grant" hyperlink. Then click on the "Add a new user to grant" link.
Two different methods are employed here to add users to the currently selected grant: One for users to be added to NSF/Teragrid platforms, and one for users to be added to non-NSF/Teragrid platforms.
If the specified grant has access to NSF/Teragrid platform(s) and you wish to add a user to a one of them, a link will be displayed to the NSF/Teragrid Add User form. All of the NSF/Teragrid platforms you have access to at the PSC will be listed with this link. If this link does not appear, the specified grant does not have access to any NSF/Teragrid platforms. This link will be displayed in the following format and may include the following machines:
"To add users to TERAGRID WIDE ROAMING or XT3, Click Here."
NOTE: CURRENTLY, THE NSF TERAGRID ADD USER FORM DOES NOT INCLUDE A PROVISION TO ADD A USER TO A GRANT WITH DETAILED ACCOUNTING PRIVILEGES. TO GIVE AN NSF TERAGRID USER ACCOUNTING PRIVILEGES, THE GRANT'S PI SHOULD SEND EMAIL TO GRANTS @PSC.EDU.
Clicking on this link will bring up the Teragrid Add/Remove User form in a new window.
To add a user to a non-NSF/Teragrid platform, fill in the add user form displayed. All of the information is required with the exception of the "Comments" box at the end. This box is available if you have special instructions regarding the addition of this user. Select the machine which you wish to add the user to by clicking the check box next to the correct machine. When all of the information has been entered, click the "Add User" button to add this user to the specified platform and grant. At this point a notification will be sent to PSC staff including the information you entered. PSC staff will then act on this notification to implement the changes you requested.
"Remove a user from grant:"
Follow this link to remove an active user from one or all of the platforms of the specified grant.
To utilize this function, login to the PSC GMS. Click on the hyperlinked grant number to select the grant which you wish to work with. Next, click the "Manage Grant" hyperlink. Then click on the "Remove a user from grant:" link.
Two different methods are employed here to remove users from the currently selected grant: One for users on NSF/Teragrid platforms, and one for users on non-NSF/Teragrid platforms.
For users on NSF/Teragrid platforms: If the selected grant has an allocation on a NSF/Teragrid platform(s), a menu box will appear listing all users on the NSF/Teragrid platforms you grant has access to. The users are listed by username and the platform they are active on. To remove a NSF/Teragrid user, follow the link at the top of the menu box to the NSF/Teragrid Add/Remove User form and follow the instructions on this page.
This link will be displayed in the following format:
"To remove users from TERAGRID WIDE ROAMING or XT3, Click Here".
Clicking on this link will bring up the Teragrid Add/Remove User form in a new window.
For users on non-NSF/Teragrid platforms: If the selected grant has a non-NSF/Teragrid allocation at the PSC, another menu box will appear listing all of the users on the non-NSF/Teragrid platforms the specified grant has access to. This menu box has the title "To remove the following user(s) from PSC platforms, check the user(s) and click submit." In it, all of the users will be listed by username and platform To remove a user, click the check box to the left of their username. When you have finished selecting users to remove from this grant, click "Submit" to finalize their removal. At this point a notification will be sent to PSC staff including the information you entered. PSC staff will then act on this notification to implement the changes you requested.
A similar box is displayed for NSF Teragrid users, but you must use the Teragrid Add/Remove user form to remove Teragrid users.

"View/update abstract."
Follow this link to view and change the abstract the PSC has on file for the currently specified grant.
To utilize this function, login to the PSC GMS. Click on the hyperlinked grant number to select the grant which you wish to work with. Next, click the "Manage Grant" hyperlink. Then click on the "View/update abstract" link.
A box will appear displaying your current abstract. Below this box is a text entry box. To add a new abstract or to make changes to your existing abstract, entire the entire abstract in its new form here. When you have finished, click on the "Submit" button to finalize your updates. At this point a notification will be sent to PSC staff including the information you entered. PSC staff will then act on this notification to implement the changes you requested.
"Manage user information for:"
This function allows you to change or update your mailing and email addresses with the PSC. You also can select which PSC mailing lists you would like to be on.
To update your address, email, phone, and fax information click on the link labeled "Update Address."
A menu box will appear containing text entry fields for the address, phone, email, and fax information the PSC has on file for you. These boxes will be automatically filled with the information we currently have on file for you. To update or change this information, simply change the text in each box you wish to change. When you have finished, click on the .Submit. button at the bottom of the page to finalize your changes. A confirmation email will be sent to both your old and your new email address to verify the changes you have entered. At this point a notification will be sent to PSC staff including the information you entered. PSC staff will then act on this notification to implement the changes you requested.
To add or remove yourself from PSC mailing lists, click on the link labeled "Add/Remove Mailing Lists".
If you are already on a PSC mailing list, a menu box will appear labeled "Remove me from this list". In this box the mailing lists you will be on are listed. To remove yourself, click on the check box to the right of the mailing list. When you have finished selecting lists to be removed from, click on the "Submit" button to finalize your selections. At this point a notification will be sent to PSC staff including the information you entered. PSC staff will then act on this notification to implement the changes you requested.
PSC mailing lists which you are not on will be listed in the next menu box, labeled "Mailing Lists which you can join". In this box, all of the mailing lists you are not on will be listed. To add yourself to one of these mailing lists, click on the check box to the right of the mailing list. When you have finished selecting lists to be added to, click on the "Submit" button to finalize your selections. At this point a notification will be sent to PSC staff including the information you entered. PSC staff will then act on this notification to implement the changes you requested.
PSC Grant Management System Documentation for PSC Accounting Users
As a PSC Accounting User, you have been given special accounting
privileges by your PI
and can access detailed grant accounting information as well as general
grant
allocation information. You can also update your own personal user
information.
NOTE: CURRENTLY, THE NSF TERAGRID ADD USER FORM DOES NOT INCLUDE A PROVISION TO ADD A USER TO A GRANT WITH DETAILED ACCOUNTING PRIVILEGES. TO GIVE AN NSF TERAGRID USER ACCOUNTING PRIVILEGES, THE GRANT'S PI SHOULD SEND EMAIL TO GRANTS @PSC.EDU.
Accessing the PSC Grant Management System:
1. Access the PSC Grant Management System by entering
https://grants.psc.edu/cgi-bin/arms/authenicate/GMS_grant.pl
into your web
browser. This address is also a link on the main PSC ARMS page.
2. You will be prompted for your PSC username and password. Enter your
username and
your Kerberos password to access the Grant Management System. You will use
the same
username and Kerberos realm password that you use to login to all of the
PSC computing
and front end systems.
3. After logging in, you will see a greeting page welcoming you to the PSC
Grant
Management System.
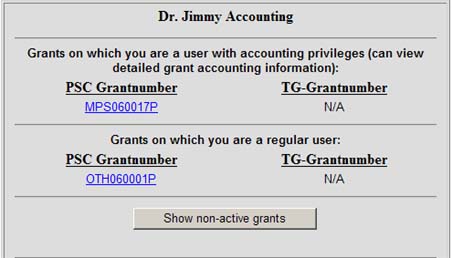
In the center of the page, you will see a greeting box labeled with
your
name. In this
box, all of the active grants your are a user on will be displayed. On the
left side,
the PSC grant number is displayed. To the right of this, the corresponding
NSF/Teragrid grant number is shown. All grants in the greeting box will be
displayed
in this manner. In the top section of the greeting box, any grants which
you are an Accounting User on will be listed. In the next section of the
greeting box,
any
grants on
which you are a regular user are listed. In the last section of the
greeting box will
be a hyperlink labeled "Display Non-Active Grants". If you have any
expired grants
that you wish to view or manage, click this link and they will be
displayed in the
same manner as the above grants. If you are not a user on any non-active
grants, the
message "There are non non-active grants to display" will be displayed.
Each PSC grant number listed is a hyperlink. Click on the grant you wish
to see
information on to access information pertaining to that grant.
If you click on a PSC grant number for which you are an Accounting User, you will be taken to a page detailing information pertaining to the grant you selected.
In the box at the top center of the page, the basic grant information for the selected grant is displayed under the title "Currently Selected Grant". This information includes the PSC grant number, the NSF/Teragrid grant number (if applicable) the PI name, the grant start and end dates, and the grant title.
Below this, under the title "Options", three hyperlinks and a "Home" link are listed. These three links will allow you to navigate between generating usage reports, viewing accounting information, managing your own personal user information, and returning to the main page. "Home" will take you to the first page of the PSC GMS.

Click on the hyperlink below to see documentation for each option:
"Display grant information for grant:"
"Display accounting information for grant:"
"Manage user information for:"
"Display grant information for grant:"
Click the "Display grant information for grant:" link to see basic information regarding the selected grant. When you click on the link, this basic information will be displayed in three boxes. When you have finished with this information, you can scroll to the top, where the other four hyperlink options are still displayed in the "Currently Selected Grant" box.
In the first box, titled "Chargeable Machines", any PSC machines which your grant has a chargeable allocation on will be displayed. All of these machines require an allocation granted and then charged from. From left to right, the platform, machine, charge ID, allocation start date, allocation end date, allocation amount, and remaining balance will be displayed. For example, if your grant received an allocation of 115,000 on the PSC HP Marvel Jonas which started on 3/31/2005, and used 10,000 units on this machine, you would see the following information displayed:
Platform - Machine - Charge ID - Start Date - End Date - Allocation - Remaining Bal
JONAS - JONAS - yourchargeid - 03/31/2005 - 03/31/2006 - 115,000 - 105,000
In the next box, titled "Non-chargeable Machines", any PSC machines which you have access to will be displayed along with the end date of your grant's access to this machine. These machines include our file archiver (EL).
Finally, in the next box, titled "Non-Active Production Machines", you will see a listing of any machines which your grant once had access to but on which your allocation has expired. These machines are displayed in the same format as "Chargeable Machines".
"Display accounting information for grant:"
This option allows you to view more detailed usage and accounting information regarding the currently selected grant. When you follow this hyperlink, you are taken to a menu labeled "Options for displaying detailed accounting information". You have several choices here to generate a report on the usage of the specified grant and it's users.
Note: The "Currently Selected Grant" menu box will still appear on your page. You can utilize the options in this box at any time. Clicking on "Home" will return you to the first page of the PSC GMS.
The output of your query is by default ordered by the run date of each job. You can change this by clicking on the drop down menu and selecting one of the other eight options.
Next, you can select a date range for your query. Enter the date which you want to start your query with in the first box and the date you want to end your query with in the second box. You can query all jobs run by entering the selected grant's start date in the first box, and either the current date or the grant's end date in the second box (depending on whether the grant is active or not).
Finally, you can specify which machine(s) you want your report to show. By default, the query will display results for all machines which the selected grant has had an allocation on. If you want to generate a more specific report, click on the drop down menu and specify which machine you would like to display.
When you have made all of your query specifications, click on the "Submit Query" button to generate a report with the results you requested. Your report will be displayed in a box, with all of the jobs listed vertically according to the specifications you selected. From left to right across the page, you will see the following information for each job:
Run Date - Username - Job ID - Resource ID - Command - SU Used - SU Charged - Refund
At the end, the SU Used, SU Charged, and Refund columns are summed.
This box is easily copied and pasted into a spreadsheet program such as Microsoft Excel.
"Manage user information for:"
This function allows you to change or update your mailing and email addresses with the PSC. You also can select which PSC mailing lists you would like to be on.
To update your address, email, phone, and fax information click on the link labeled "Update Address."
A menu box will appear containing text entry fields for the address, phone, email, and fax information the PSC has on file for you. These boxes will be automatically filled with the information we currently have on file for you. To update or change this information, simply change the text in each box you wish to change. When you have finished, click on the .Submit. button at the bottom of the page to finalize your changes. A confirmation email will be sent to both your old and your new email address to verify the changes you have entered. At this point a notification will be sent to PSC staff including the information you entered. PSC staff will then act on this notification to implement the changes you requested.
To add or remove yourself from PSC mailing lists, click on the link labeled "Add/Remove Mailing Lists".
If you are already on a PSC mailing list, a menu box will appear labeled "Remove me from this list". In this box the mailing lists you will be on are listed. To remove yourself, click on the check box to the right of the mailing list. When you have finished selecting lists to be removed from, click on the "Submit" button to finalize your selections. At this point a notification will be sent to PSC staff including the information you entered. PSC staff will then act on this notification to implement the changes you requested.
PSC mailing lists which you are not on will be listed in the next menu box, labeled "Mailing Lists which you can join". In this box, all of the mailing lists you are not on will be listed. To add yourself to one of these mailing lists, click on the check box to the right of the mailing list. When you have finished selecting lists to be added to, click on the "Submit" button to finalize your selections. At this point a notification will be sent to PSC staff including the information you entered. PSC staff will then act on this notification to implement the changes you requested.
PSC Grant Management System Documentation for Regular PSC Users
As a regular PSC User, you still can use the GMS to access general grant
allocation
information and update your own personal user information.
Accessing the PSC Grant Management System:
1. Access the PSC Grant Management System by entering
https://grants.psc.edu/cgi-bin/arms/authenicate/GMS_grant.pl
into your web
browser. This address is also a link on the main PSC ARMS page.
2. You will be prompted for your PSC username and password. Enter your
username and
your Kerberos password to access the Grant Management System. You will use
the same
username and Kerberos realm password that you use to login to all of the
PSC computing
and front end systems.
3. After logging in, you will see a greeting page welcoming you to the PSC
Grant
Management System.
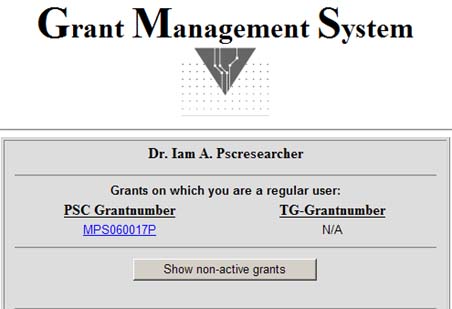
In the center of the page, you will see a greeting box labeled with
your
name. In this
box, all of the active grants your are a user on will be displayed. On the
left side,
the PSC grant number is displayed. To the right of this, the corresponding
NSF/Teragrid grant number is shown. All grants in the greeting box will be
displayed
in this manner. In the last section of the
greeting box will
be a hyperlink labeled "Display Non-Active Grants". If you have any
expired grants
that you wish to view or manage, click this link and they will be
displayed in the
same manner as the above grants. If you are not a user on any non-active
grants, the
message "There are non non-active grants to display" will be displayed.
Each PSC grant number listed is a hyperlink. Click on the grant you wish
to see
information on to access information pertaining to that grant.
If you click on a PSC grant number, you will be taken to a page detailing information pertaining to the grant you selected.
In the box at the top center of the page, the basic grant information for the selected grant is displayed under the title "Currently Selected Grant". This information includes the PSC grant number, the NSF/Teragrid grant number (if applicable) the PI name, the grant start and end dates, and the grant title.
Below this, under the title "Options", two hyperlinks and a "Home" link are listed. These two links will allow you to navigate between generating viewing grant information, managing your own personal user information, and returning to the main page. "Home" will take you to the first page of the PSC GMS.
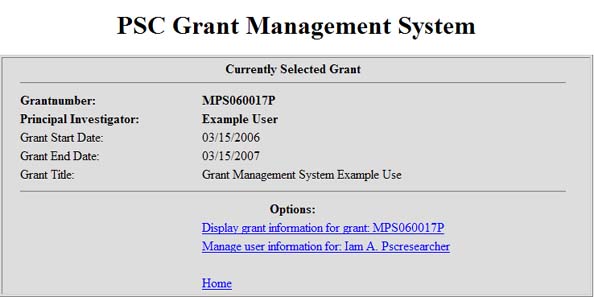
Click on the hyperlink below to see documentation for each option:
"Display grant information for grant:"
"Manage user information for:"
"Display grant information for grant:"
Click the "Display grant information for grant:" link to see basic information regarding the selected grant. When you click on the link, this basic information will be displayed in three boxes. When you have finished with this information, you can scroll to the top, where the other three hyperlink options are still displayed in the "Currently Selected Grant" box.
In the first box, titled "Chargeable Machines", any PSC machines which your grant has a chargeable allocation on will be displayed. All of these machines require an allocation granted and then charged from. From left to right, the platform, machine, charge ID, allocation start date, allocation end date, allocation amount, and remaining balance will be displayed. For example, if your grant received an allocation of 115,000 on the PSC HP Marvel Jonas which started on 3/31/2005, and used 10,000 units on this machine, you would see the following information displayed:
Platform - Machine - Charge ID - Start Date - End Date - Allocation - Remaining Bal
JONAS - JONAS - yourchargeid - 03/31/2005 - 03/31/2006 - 115,000 - 105,000
In the next box, titled "Non-chargeable Machines", any PSC machines which you have access to will be displayed along with the end date of your grant's access to this machine. These machines include our file archiver (EL).
Finally, in the next box, titled "Non-Active Production Machines", you will see a listing of any machines which your grant once had access to but on which your allocation has expired. These machines are displayed in the same format as "Chargeable Machines".
"Manage user information for:"
This function allows you to change or update your mailing and email addresses with the PSC. You also can select which PSC mailing lists you would like to be on.
To update your address, email, phone, and fax information click on the link labeled "Update Address."
A menu box will appear containing text entry fields for the address, phone, email, and fax information the PSC has on file for you. These boxes will be automatically filled with the information we currently have on file for you. To update or change this information, simply change the text in each box you wish to change. When you have finished, click on the "Submit" button at the bottom of the page to finalize your changes. A confirmation email will be sent to both your old and your new email address to verify the changes you have entered. At this point a notification will be sent to PSC staff including the information you entered. PSC staff will then act on this notification to implement the changes you requested.
To add or remove yourself from PSC mailing lists, click on the link labeled "Add/Remove Mailing Lists".
If you are already on a PSC mailing list, a menu box will appear labeled "Remove me from this list". In this box the mailing lists you will be on are listed. To remove yourself, click on the check box to the right of the mailing list. When you have finished selecting lists to be removed from, click on the "Submit" button to finalize your selections. At this point a notification will be sent to PSC staff including the information you entered. PSC staff will then act on this notification to implement the changes you requested.
PSC mailing lists which you are not on will be listed in the next menu box, labeled "Mailing Lists which you can join". In this box, all of the mailing lists you are not on will be listed. To add yourself to one of these mailing lists, click on the check box to the right of the mailing list. When you have finished selecting lists to be added to, click on the "Submit" button to finalize your selections. At this point a notification will be sent to PSC staff including the information you entered. PSC staff will then act on this notification to implement the changes you requested.